How to Upload Off of Hitfilm Windows
The complete HitFilmExpress user guide is bachelor at this link or by going to the Help menu in HitFilmExpress and choosing Online Help.
Copying and Organizing Files
Unless you have hundreds of gigabytes of free space on the internal hard drive of your computer, it'south a good idea to go on footage on an external hard drive. Yous should create a folder for each form yous will exist producing media in. Use naming conventions that would make sense to anyone. These should at to the lowest degree include the bookish term, twelvemonth, and the proper name of the class. (If you lot proper noun things in obscure ways fifty-fifty y'all won't be able to notice anything in a few years.)
Within your class folder, you lot will create a folder for each project that you piece of work on for that grade. Once more, apply appropriate naming conventions (date, project name, your proper noun, etc.)
Finally within your project folder, make a folder for your footage. Whether y'all are downloading or transferring some other manner, place your footage into this folder.
Activate HitFilm Limited
When you launch HitFilm Express, you will be presented with a screen that says "Actuate & UNLOCK." Click on that. If you already take an account, you can login.
Otherwise, click on "CREATE AN Business relationship." You volition be taken to a browser window to make full out some information. Choose a display name. (This can exist anything, merely information technology might be useful if information technology at least includes your existent proper noun.) Enter your Carleton e-mail address and choose a password. Make full out the rest, and click "CREATE Account." In one case yous've created your account, yous tin relaunch HitFilm Express and click on "Activate & UNLOCK" again. From there, login and relaunch the program again to start your activated session of HitFilm Limited.
Setting up your Project
Click "New" in the upper left of the main screen. In the console that opens, choose the following settings:
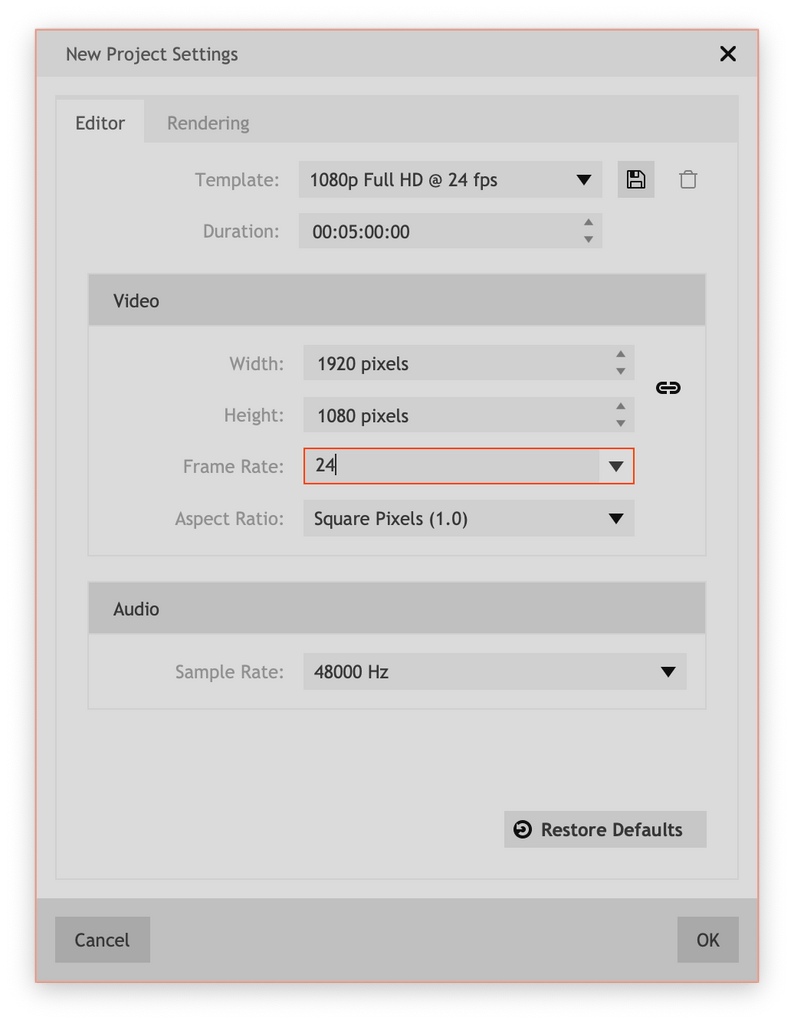
When you lot select a Template, the Video and Audio settings will be prepare automatically. Check that the template you chose matches the moving picture above. Click "OK," and you lot should see this:
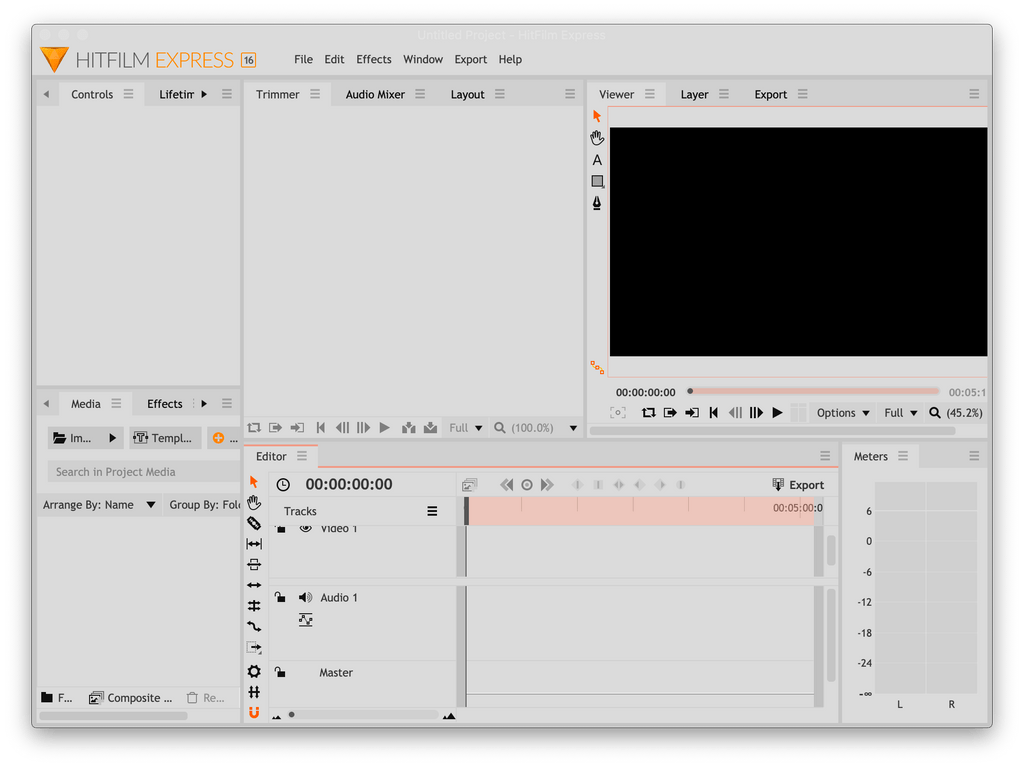
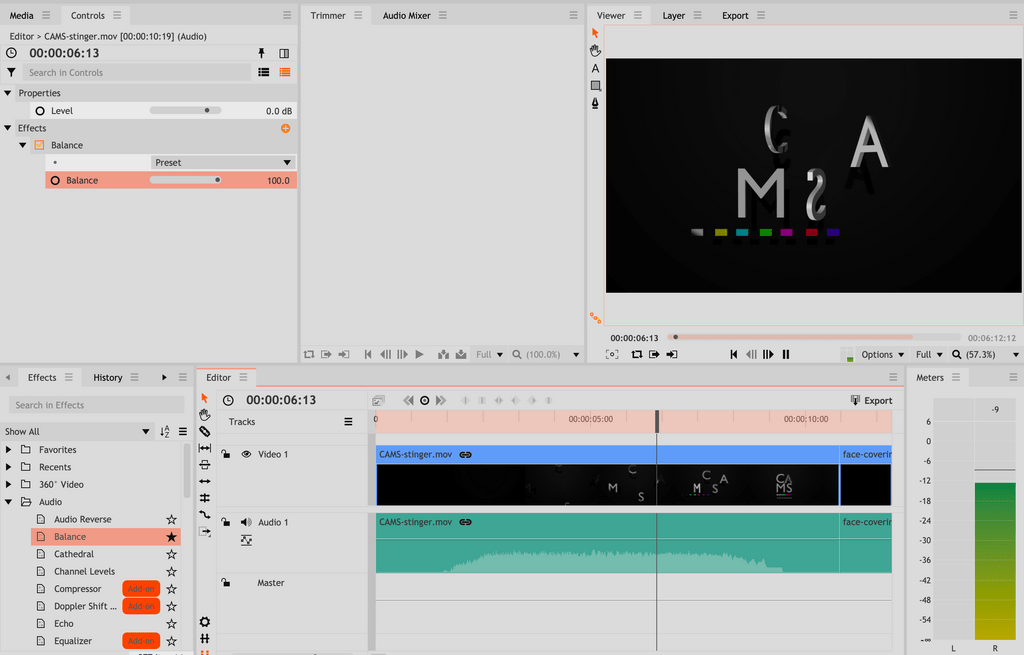
Get familiar with the basic panels you are seeing. In the lesser correct is the editor. Information technology shows a timeline with one track each for Video and Audio to beginning out. In the bottom left is the Media console. This is where your video clips will live. In the upper left is the Trimmer panel. This is where yous tin preview and trim your footage to add it to the timeline. In the upper right is the Viewer panel. This is where you can view your projection as y'all work on it.
If your screen doesn't wait like this, click on Window –> Workspaces –> Editing.
And then click Window –> Workspaces –> Reset Workspace.
Recording without FiLMiC Pro (iPhone)
If you lot accept an iPhone merely y'all're not using FiLMiC Pro, it's a good idea to consider changing video settings on your phone:
-Beginning by going to Settings.
-Curlicue downward and tap "Camera."
-Tap "Formats."
-Tap "Most Compatible."
This will turn off HEVC and will allow yous to import your footage directly into whatsoever version of HitFilm Express. If you lot want to shoot a piece of sample HEVC footage kickoff and see whether your version of HitFilm Express can handle HEVC, do speak with your instructor about the results.
Converting HEVC footage
If you lot wish to avoid some rather tedious extra work subsequently you've shot a project's worth of footage, it would be tremendously savvy to shoot a piece of test footage, import it into HitFilmExpress, and edit it a little. Here's why.
If you recorded your video clips with the native camera app on iPhone running iOS 11 or afterwards, and y'all didn't plough off HEVC (above), then your video was recorded with the somewhat new HEVC (H.265) video codec. Only with version 16 (released December 10, 2020) can HitFilm Express recognize HEVC video.
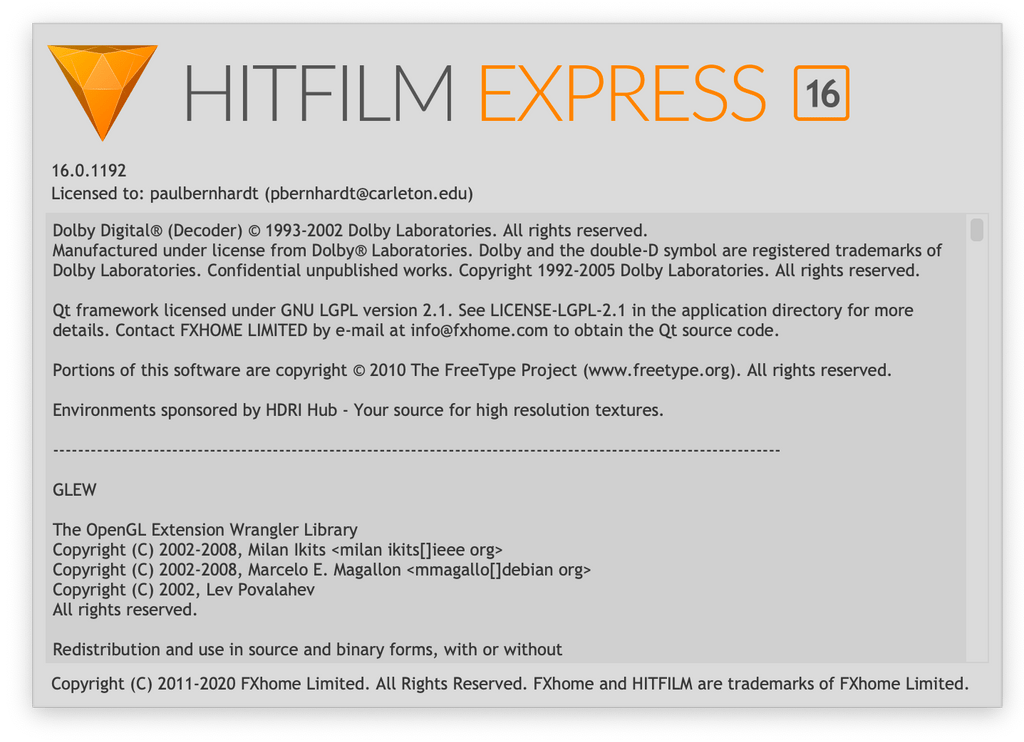
If you lot shot HEVC and HitFilmExpress is having trouble with information technology, check what version of HitFilmExpress you lot take past clicking on the Help menu –> About HitFIlmExpress. Effort updating to the latest version of HitFilm Express if needed.
Otherwise, you'll need to catechumen your footage, which you can practise with QuickTime on macOS 10.13 (High Sierra) or later:
-Open each clip with Quicktime.
-Click "File –> Export As –> 1080p…."
-Make sure "Use HEVC" is non checked.
-Choose a destination for the file and click "Relieve."
This new file y'all just created will exist recognized by HitFilm Limited. Echo for each video clip recorded as HEVC.

Importing & Organizing Footage
Now click on import in the bottom left panel. Navigate to your footage folder inside the binder for the project. Select all of your footage and click "Open." You should now see all of your footage in the Media console.
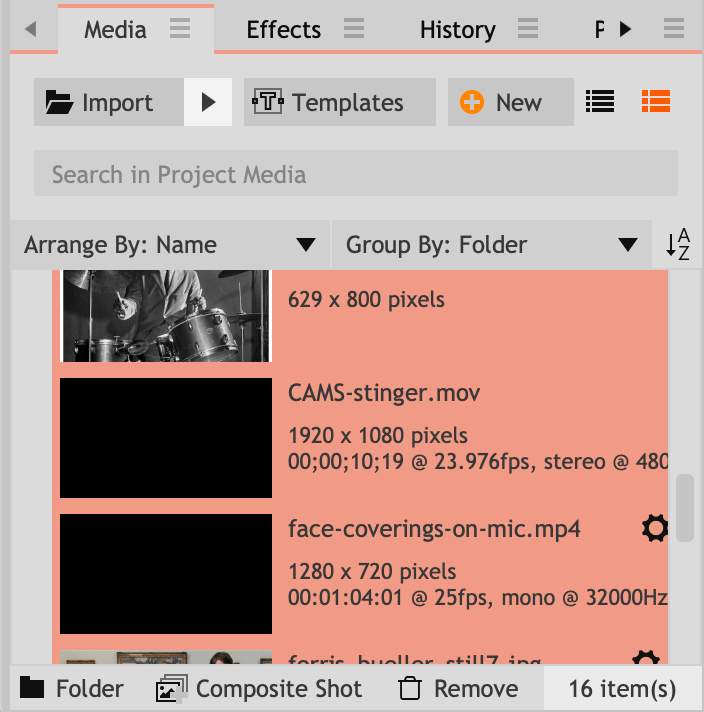
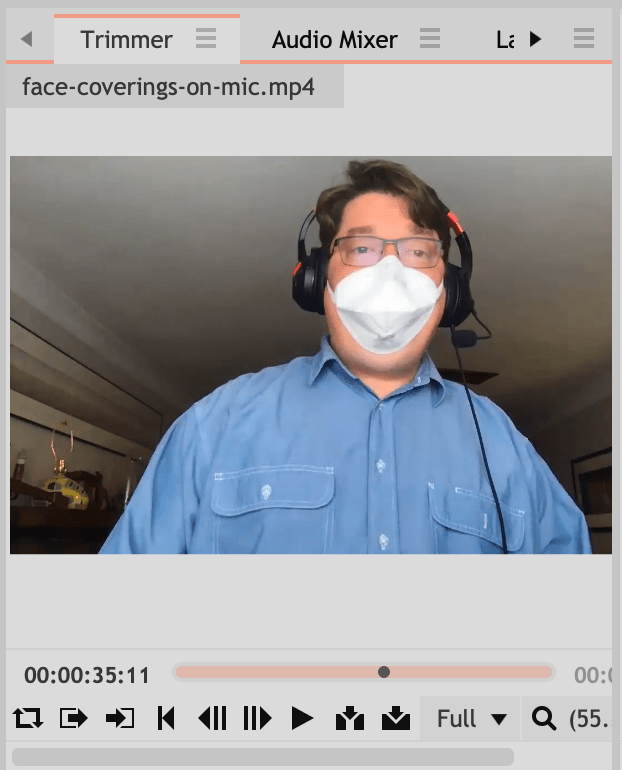
When yous click on a prune, it should appear in the Trimmer console above for yous to preview:
In the bottom left of the Media panel, click "Folder." This creates a new folder to organize your footage. Start typing immediately and and then press the return key to fix the folder name. Drag all of your footage into the folder. Each separate day of footage should get its own folder.
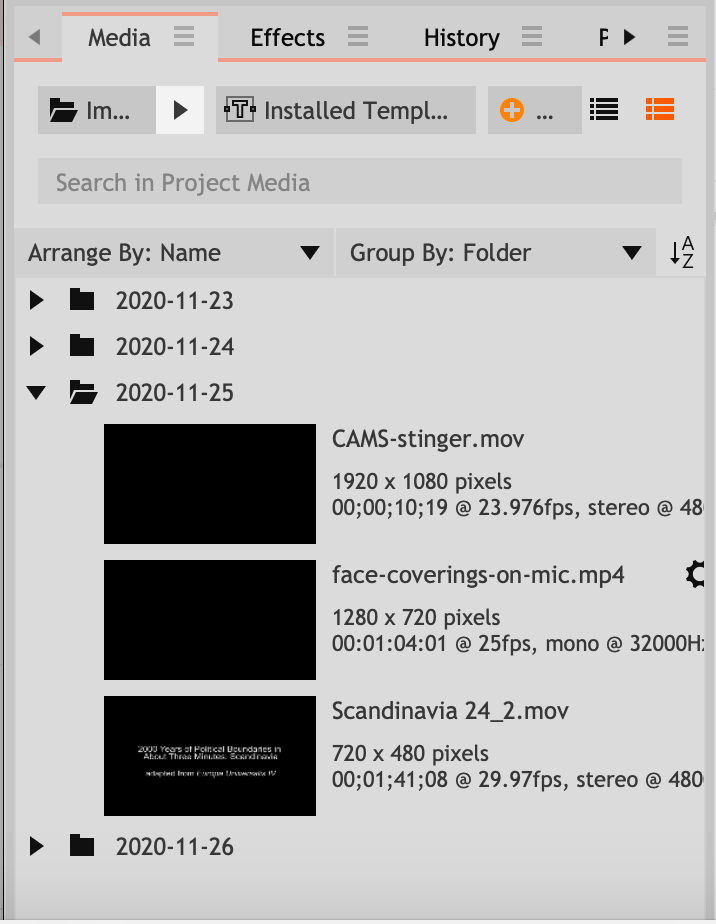
If y'all're having a hard time seeing everything you lot might want to toggle the view blazon betwixt list manner and preview mode past clicking the buttons in the upper right of the Media Panel.

Putting Clips on the Timeline
Select a clip you'd like to put on the timeline. It appears in the Trimmer panel, and now you tin can preview it past pressing the spacebar.
You may want to trim off unnecessary pieces of the clip before you lot put it on the timeline. To do this, play or drag the playhead until y'all achieve where you want the clip to start. Press the letter i key on the keyboard. This sets the "in signal." Notice that the orange bar representing the duration of your clip at present starts at the current position. Next, accelerate to where you lot desire the prune to end. Press the alphabetic character o key on the keyboard, which sets the "out point." The orange bar should now end at this position.
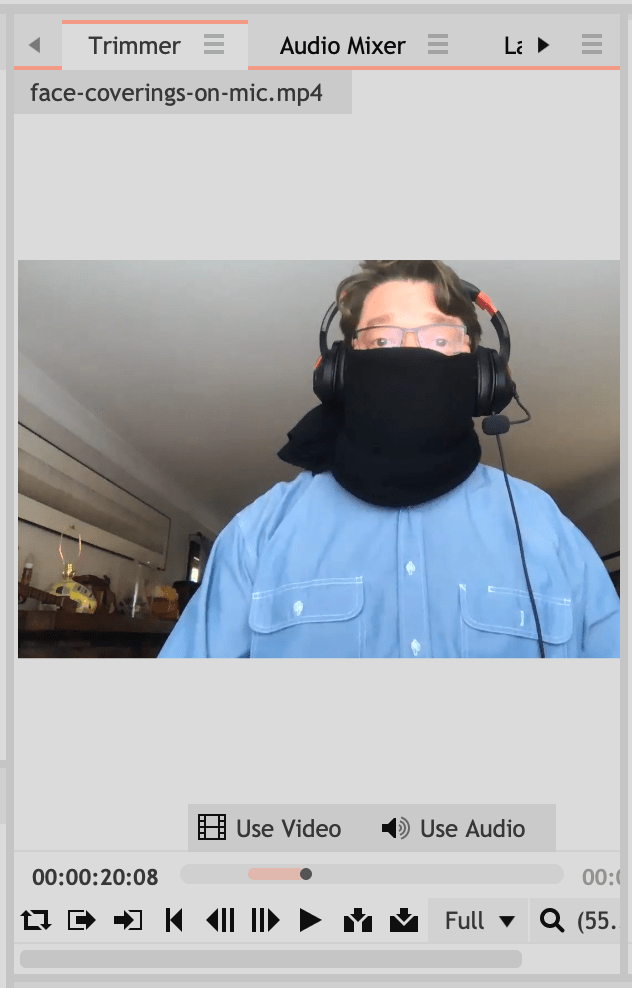
Now, think well-nigh whether you want to employ video and audio, or just video or simply audio. If you are using both an audio, simply click and drag the prune you just trimmed from the media browser onto the timeline. Green boxes will show y'all where the prune is going to appear. If you want to use only video or only audio, move your mouse over the preview in the Trimmer panel. You should run across the options "Utilize Video" and "Use Audio." Y'all can click and drag each of these onto the timeline to use only the video or only the sound from your clip.
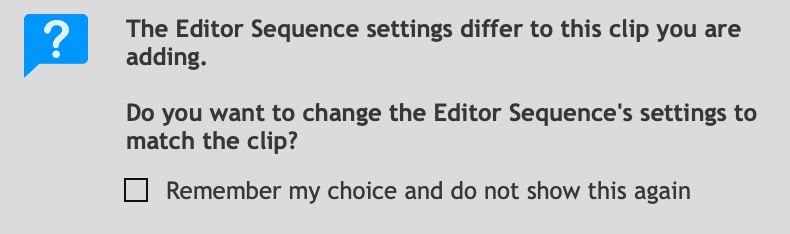
If for whatsoever reason the clip you just trimmed has properties different from the sequence settings you chose earlier (1920×1080, "24" frames per second, etc.), HitFilmExpress will notice the difference and ask whether you lot'd like to change the sequence settings to lucifer the footage. This sounds reasonable, and the software is trying to be helpful, but the right answer us usually no.
Navigating on the Timeline
With only a couple clips on the timeline, you won't accept trouble viewing and cutting your entire project all in one position. If your project gets much longer, though, you'll want to zoom in and out and move left and correct through your project.
To scroll left and correct, y'all tin can use the scroll bar at the bottom of the timeline. (On a Mac, you can use Option + left pointer key or correct arrow key.) To zoom in and out, you can use the zoom slider near the lesser of the timeline at the left. (Under Windows, you can agree down the Control push button and curl up and down.)
Layers
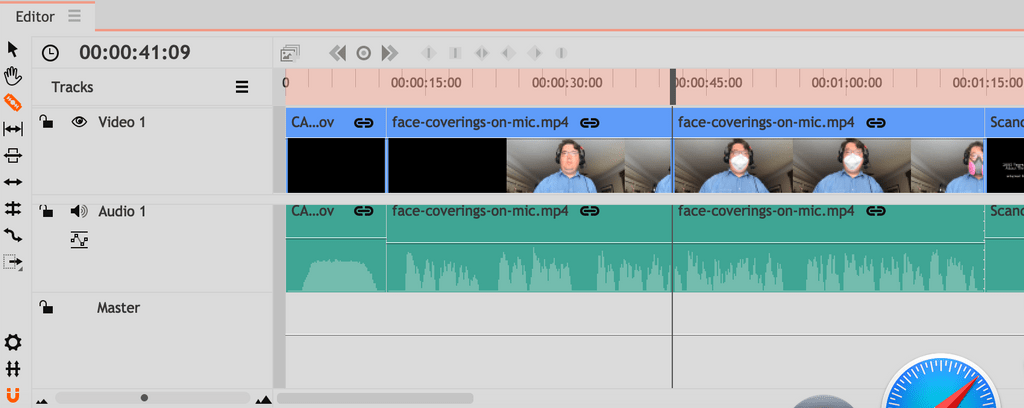
Yous may want to add together layers to your project. The easiest fashion is to do this is to drag a video clip in a higher place the highest video runway. This volition automatically create a new video track for you above all the others. Similarly, you can create a new audio track by dragging an audio clip below the lowest existing audio rail.
Notice that if you put a video clip in a layer over another video clip, just the summit prune will exist visible. Notwithstanding, if you layer two audio clips on acme of one some other, both sound clips volition play simultaneously.
Trimming
You can get quite accurate setting in- and out-points in the Trimmer. Only y'all might change your mind near when a prune should begin or cease, later you've put it on the Editor timeline.
The main edit you will be making is the simple trim:
-Click once on a prune on the timeline.
-Move your mouse over the beginning or end of a clip in the timeline. Yous should run into a green bracket appear.
-Click and drag the dark-green bracket to trim your clip. This volition shorten or lengthen your prune past irresolute where it ends.
Splitting
Another important edit you'll brand is the dissever or slice. Then far, your cursor has been the Selection tool. Await along the left-mitt side of the Editor console for a vertical list of tools. The Pick tool is an pointer pointing north by northwest.

The Slice tool looks like a razor bract.
-Click once on the Slice tool from the left hand side of the Editor panel.

-Now when you move your mouse over a clip in the timeline, your cursor volition look like a razor blade.
-When you click once, information technology will slice the prune in two where you clicked.

When y'all click on the prune the clip will be split in two where y'all clicked. Switch dorsum to the selector tool and come across that these two clips are now separate. You can pull them apart and put them in unlike places on the timeline.
Shortcuts
It tin be a waste matter of fourth dimension to have to click back and forth between the selector tool and the razor tool. To make it faster, use their keyboard shortcuts. Use the Five key for selector and C key for razor.
Linking Media
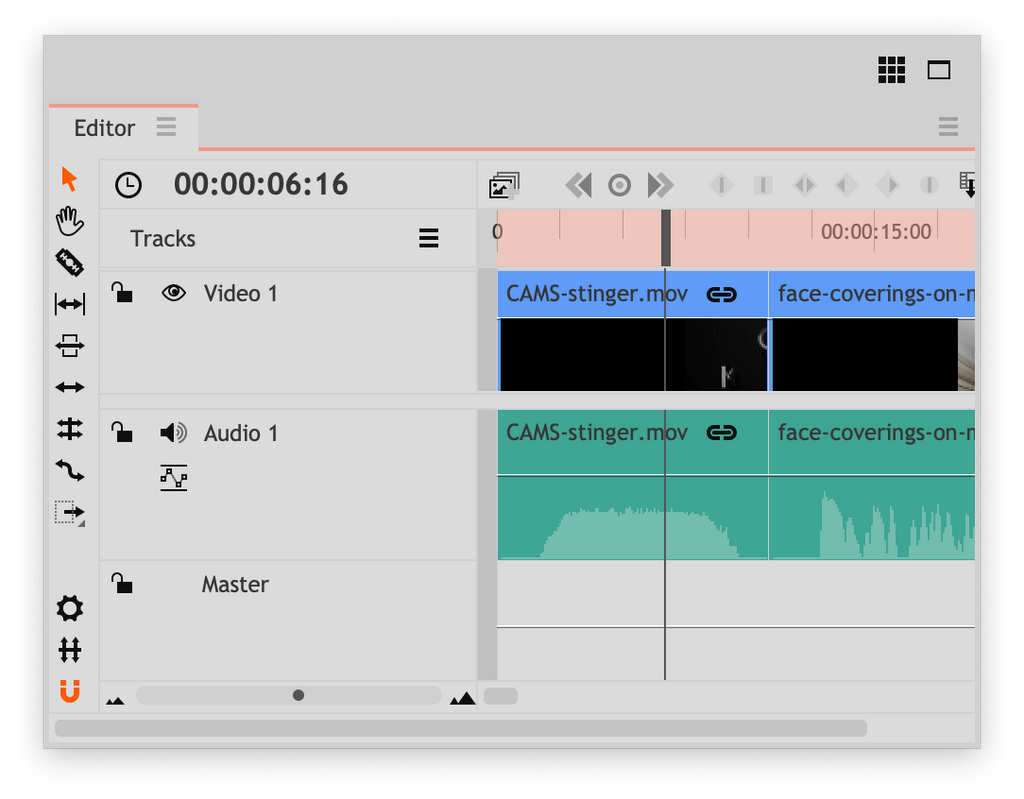
When you elevate a clip that has video and audio onto the timeline, it will beginning out linked. Linked media has a linked chain symbol over each of its associated pieces of media. This means that when you lot change it, you modify all linked components.
You may want to unlink the media. To practise this, select the linked media and then press SHIFT, COMMAND (Command for Windows), and \ (forward slash). Now the media is unlinked.
To link media, select all pieces of media y'all would like to link then press COMMAND (Command for Windows) and \ (forward slash).
Clip Volume
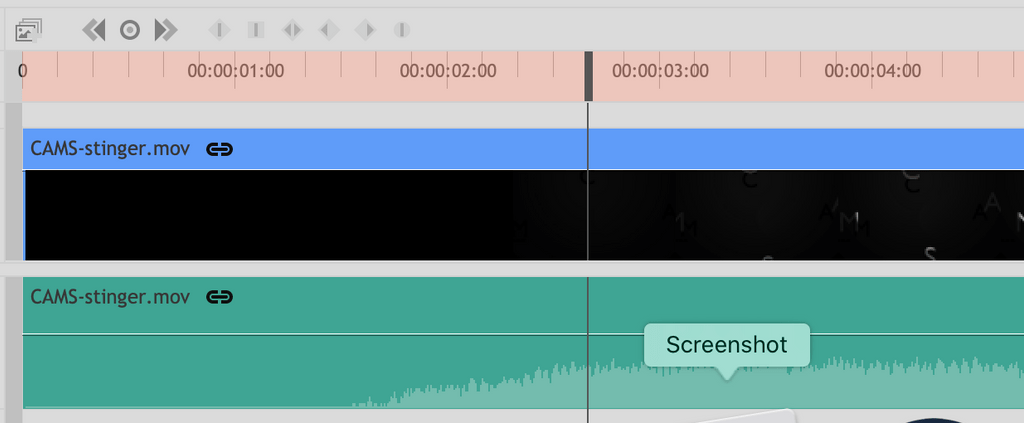
Notice that there is a band going across each of your sound clips in the timeline. When y'all move your cursor over this band, you can see that it indicates you can motion it upwards or downwardly. Click and drag on the band, and watch as the values change. The possible values range from -60dB to 12dB.
This is not how loud your audio is. Information technology is how much y'all are adjusting your audio by. To get your audio to the correct level, you will demand to look at the meters panel on the correct side of the screen. Play your clip, and watch the meters.
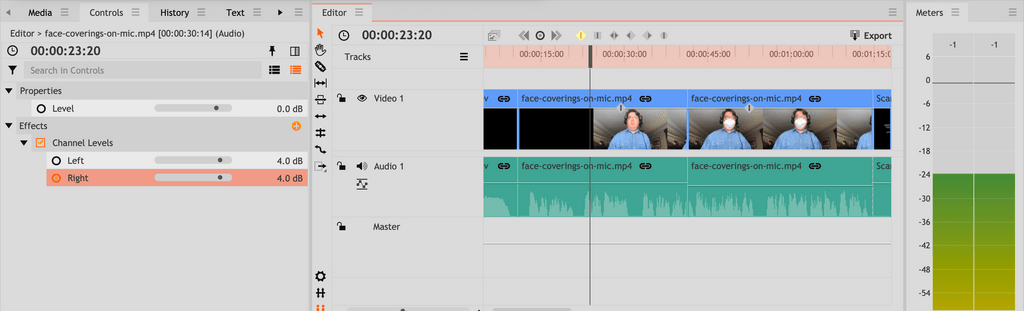
My screen take hold of (to a higher place) happened to catch what HitFilm Limited looked like at 0:23:20 in my sample video–that's zero minutes, 23 seconds, and 20 frames after the beginning. But there are about two,000 sound samples in the elapsing of that frame of video! The audio meters happened to catch levels at 24 dB in this motion picture. Levels might accept been much louder or much quieter the very next instant.
The most important affair to call back is never let your levels hit 0 dB. If they do, the audio point volition distort and your project may become unlistenable. To be safety, it'south a good idea to make sure that nothing in your project e'er reaches above -3dB, but where the meters are turning scarlet.
If the loudest sound in your projection lands at -3 dB, keep some perspective on where everything else should state. -6dB and higher up may be reserved for those extremely loud sounds that you might not even have in your project: a cracking sound or a yell (unusually loud sounds). -12dB is a good spot for people speaking (prominent sounds). The sound of a quiet room should be beneath -30dB (background sounds). It'due south a good idea to lay out this mental map before you even start, because if you set the quiet footsteps at -12dB and the dialogue at -6dB, when you get to the big explosion you'll have nowhere to get.
Also pay attention to layers of audio. Creating a detailed soundscape volition crave you to layer multiple sounds and so that they play simultaneously. The loudness of the two sounds volition add together up, resulting in a louder overall result. The background racket of the two sounds will add up as well.
Fades and Cross Fades
Though information technology's advisable to cutting directly to or from black in video, it is not the same with audio. If you hard cut at the beginning or end of an audio clip, at that place is a loftier chance that the starting amplitude of the waveform volition non exist null. This sudden bound in amplitude will result in an audible pop. Even if you don't inadvertently generate a pop, going from truly no sound straight to audio–even relatively quiet groundwork noise–is jarring and unprofessional.
To permit the amplitude to rise without any sudden jumps (and eliminate the chance of creating a pop), we apply a Fade or Cross Fade to the showtime of the audio. Hither's how:
-Make sure your cursor is the Select tool (the North Past Northwest arrow.)
-Hover over the beginning of a clip.
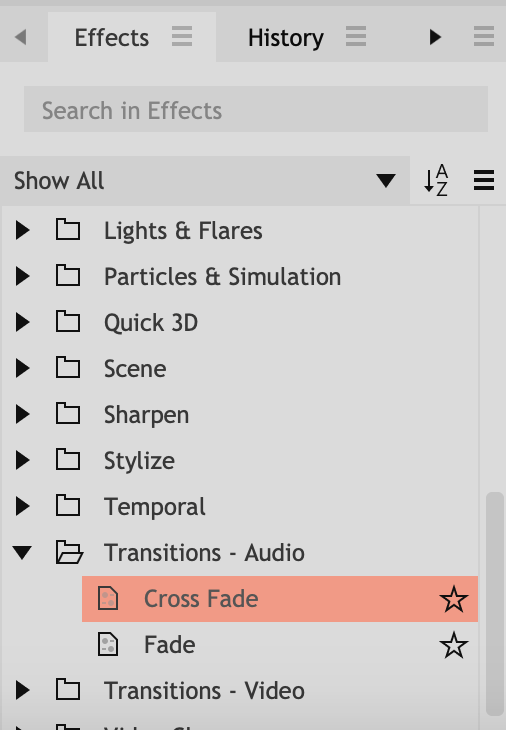
-Go to the Furnishings window. (If you can't find it, get the Window menu in HitFilm Express and cull Effects.)
-Scroll down to Transitions – Sound and open that folder.
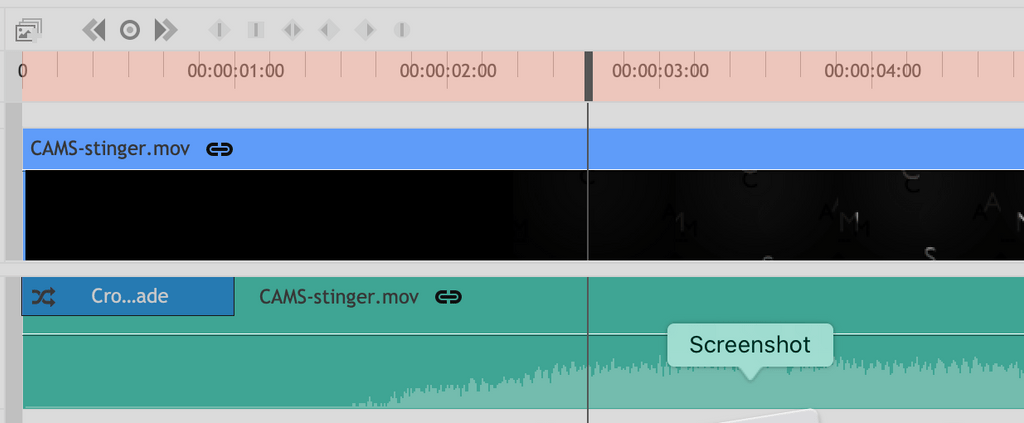
-Drag a Cantankerous Fade onto the start of your audio on the timeline.
-At present you have a lovely, smooth one-2d transition from silence to the first sound you want the audience to hear. Very professional.
You could also utilise a Fade. In this context, at the beginning of a slice of audio, it would do the aforementioned thing. Also at the end of a piece of audio.
Cross Fades
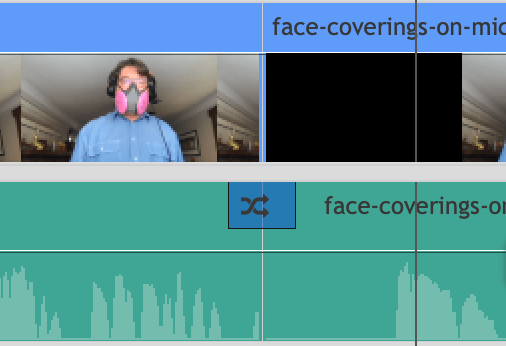
If you are fading betwixt audio clips, you lot'll demand to utilise a crossfade. If this is getting hard to proceed track of, just e'er use a Cross Fade.
Make sure that your audio clips overlap a little scrap, and so drag the Cross Fade onto the spot where ii encounter. When your timeline has this symbol on it, the two crossed arrows, you've applied a Cantankerous Fade. Fades and Cross Fades can exist fabricated longer or shorter past clicking on either end of the fade and dragging information technology one way or the other. The simply way to know if you've done what you want information technology to practice is to play it back and heed closely.
Keyframes
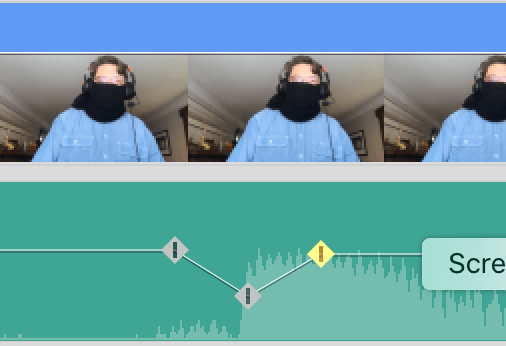
Setting keyframes lets you modify a slice of audio's volume over fourth dimension. Setting a keyframe is equally easy every bit clicking once on the book line for a piece of audio. That makes a little diamond shape with a tiny vertical line in it. That's your commencement keyframe! A keyframe on its own is similar one paw clapping: it needs another hand to clap against. A keyframe only does something in relation to another keyframe, nonetheless about or far away information technology might exist.
At that place might be a spike in your audio that gets too loud just you like the volume level of the remainder of the sound. You can zoom manner in, place a keyframe on the spike, and a pair of keyframes effectually that keyframe, and so drag the middle keyframe as far downwardly as you need to continue the spike from going higher up -iii dB. This is quite labor-intensive to practice more than a couple times.
Or you might want to play music at full for a while, and then employ two keyframes to arrange the music downwards just earlier someone begins to talk, only not fade the music out completely. Nosotros say there's music "under" the voiceover. When the talking's done, you can apply 2 more keyframes to bring the music back to total volume.
Residual
You might want to control what direction an audio clip sounds similar it's coming from. What you lot're really doing is deciding what proportion of the audio to send to the left or right aqueduct in a stereo mix. Not then different from playing with the balance knob on a home stereo but now, instead of just altering playback, y'all're in command of the program! To practice this, we'll use an effect called "Residue."
In the lower left panel, select the "Furnishings" tab. Under "Audio" observe "Balance." Click and drag the effect onto the clip you lot would like to modify in the timeline. The lower left panel should switch automatically to the "Controls" tab. Now yous should see controls that let you manipulate balance effect. Click the dropdown triangle to the left of the discussion Balance.
The values for residual range from -100 (full left) to 100 (full right). At -75 yous will become more often than not audio from the left channel and some audio from the right channel.
The only way to make sure information technology sounds the fashion you want is to use a change, rewind, play back, and listen closely, then modify what yous've done every bit needed. As more than sound comes from one aqueduct, the audio sounds similar it'southward coming from that management. You can use this to make your clips in a stereo mix audio like they are coming from somewhere specific in space. We don't usually do this to dialogue unless you really want to make information technology sound similar someone's hollering from the next room, offscreen.
Adding Titles
In the viewer panel click on the letter A.

Side by side, click inside the image in the viewer. You volition see that a title element appears on the timeline where your playhead was. If there were no bachelor video tracks, HitFilm will create a new video rails for the championship.
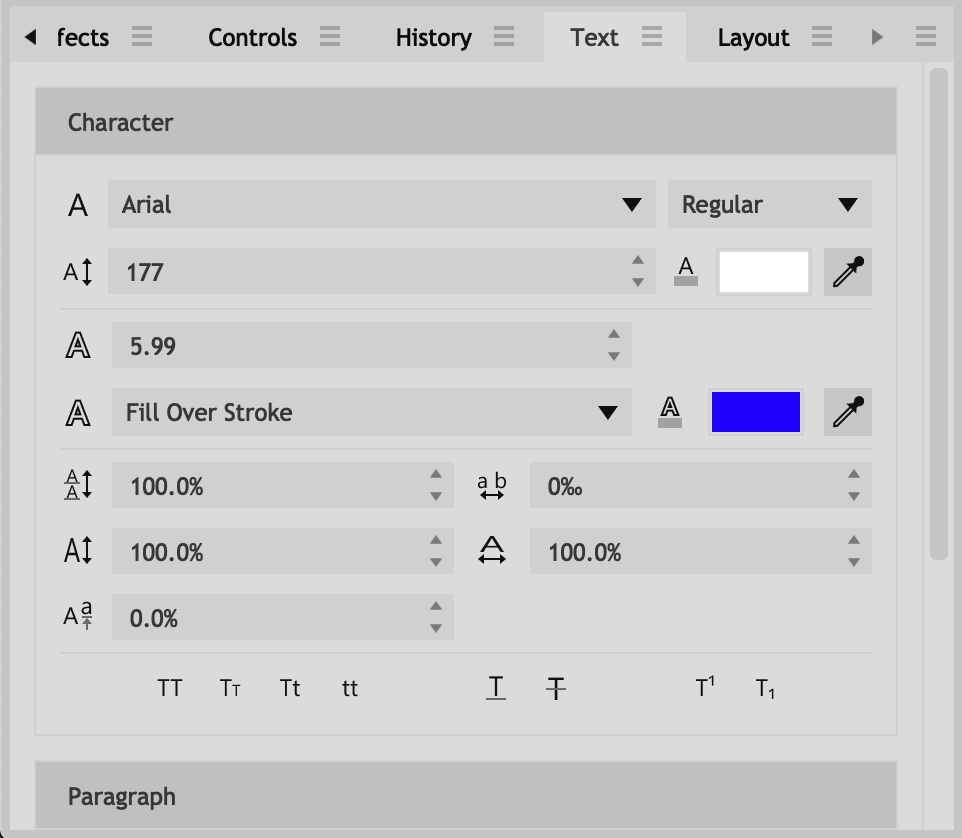
Yous may desire to command the size, color, or font of your text. Navigate to the Text console to control these aspects.
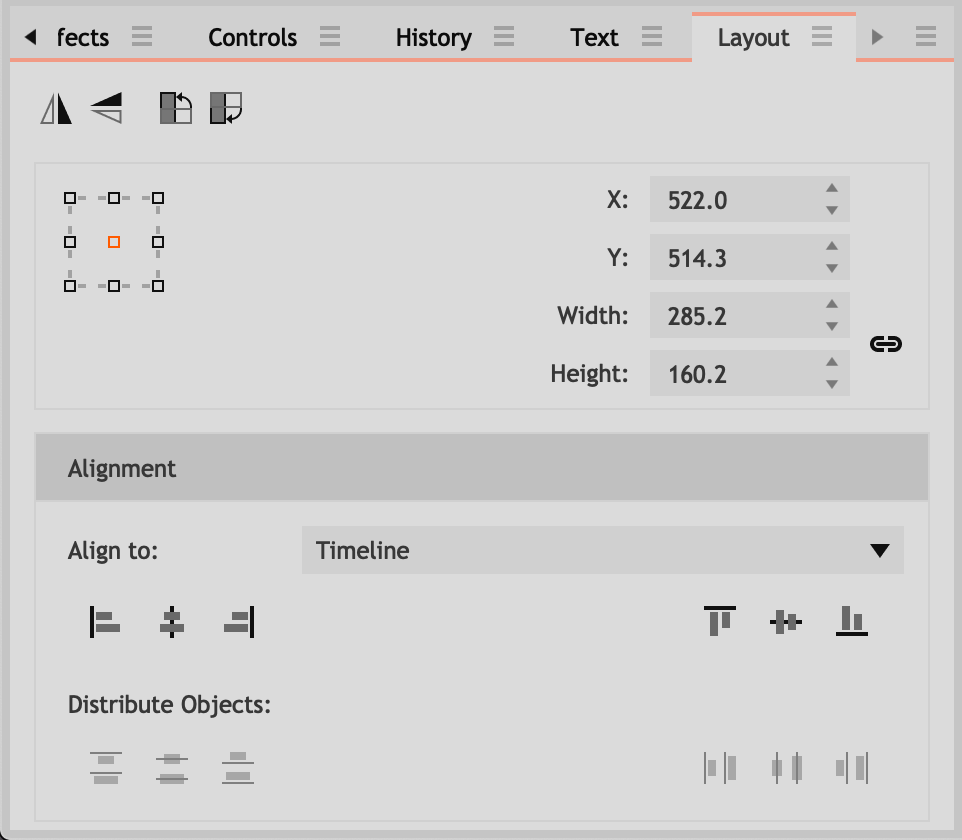
To eye your title on the screen, navigate to the Layout console. If it is not open up click "Window > Layout" to open information technology. Under "Align to:" y'all can select vertical center and horizontal center.
Consign your project
The work is done… almost. The edit'south washed, but you demand to do one more very important thing and then others tin see it. You need to export a version of information technology.
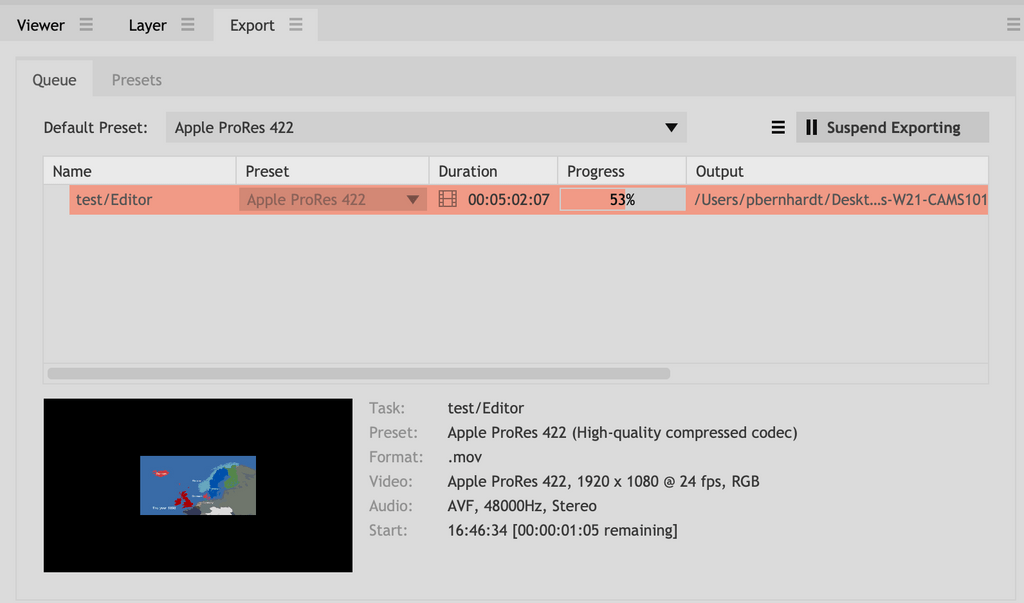
-Go to the Export window. (If you don't see this, click on the Window bill of fare –> Consign.)
-Choose the default preset indicated by your instructor. YouTube 1080p HD exports as H.264. Apple ProRes 422 exports as a less-compressed, only larger, QuickTime file with your video encoded every bit ProRes 422. It'southward of import to be intentional about this choice of presets so y'all're handing in what your teacher wants and non some other random situation.
-Now go to the Export carte and choose To File… (If the Export option is grayed out, your Editor panel isn't selected.)
-HitFilm Express volition open a new window that asks you to give the file a name (please follow your instructor's naming conventions) and browse to a place where y'all want it to write the file.
-Click "Save" and your movie volition begin exporting in the format y'all chose.
Further resources
Getting started with HitFilm: https://www.youtube.com/watch?v=HdMyt_EZjk4
Customizing your interface: https://www.youtube.com/watch?v=X8LtUtXEgYQ
Color Grade with Curves: https://world wide web.youtube.com/watch?five=t4AH-yM-7U8
The complete HitFIlmExpress user guide is available at fxhome.com/reference-manuals/hitfilm-express or past going to the Assist card in HitFilmExpress and choosing Online Help.
campbellgoiderearsur1963.blogspot.com
Source: https://www.carleton.edu/cams-production/cinematechs/hitfilm-express/
0 Response to "How to Upload Off of Hitfilm Windows"
Enviar um comentário